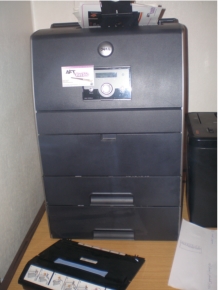
Dell 3100CN - Bigger is best(!)
The Problem
I noticed the smudging and streaks were only appearing amongst the colours, excluding the black areas. Initially I thought my ink levels were down. It wasn’t the ink, it seemed, however, like something was rubbing against the paper as it was fed out after being printed. The streaks were in the direction the paper was fed, so I started investigating further. I thought it could have been my drum cartridge packing up (usually should be replaced after 100,000 prints but I was nowhere near the limit). This would also have ended up costing me an arm, a leg and possibly a testicle too(!) Dell drum cartridges don’t come cheap, people!
The Solution
After scouring a few forums here and there, I came across one particular thread (which I have forgotten the URL to, so apologies to the person who issued the fix) where other 3100CN users had the same problem. The fix was quite surprising, it meant I had to dig out my screw drivers and tools.
This fix, by the way, also fixes the problem of lines running the direction of paper travel on colour prints. The drum unit’s lid is attached with six screws. The whole drum unit needs to come out of the printer first, so grab the blue handles and carefully pull it out:
- Open the printer from it’s top panel and unsecure the drum unit by lifting the blue lever on the right.
- Place the drum unit on a clean and level surface and avoid touching the transfer belt (the decal with the four arrow points).
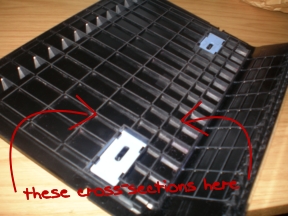
- The top cover, where the blue handle is attached, has six screws attaching it. Remove the screws (two screws located at the top next to both ends of the blue handle, next two are in the middle, and the final two screws are at the lower corners of the big decal).
- Carefully lift the cover from the drum unit and cover the transfer belt with some clean paper, to protect it from bright light.
At this stage, you can choose to carefully re-install the drum unit back into the 3100CN. Run some colour-prints and see if your problem has disappeared. Voila(!) Mine disappeared and I chose to leave my drum unit in the printer whilst I carried out the following steps:

The Suspect
- Place the cover down on a level surface, upside-down.
- Using a palm-sander with 320-grit sandpaper and light pressure, sand the ribs going in both directions.
- Confirm the areas have been sanded by checking the areas (they should be less ‘glossy’ than the non-sanded areas).
- Switch to 600-grit sandpaper and do a lighter sanding.
- Rinse the cover in cool water, making sure all the excess has been washed away from between the ridges. Hot water could cause the cover to bend, use with caution.
- Dry completely. Use compressed air if you have to, just make sure it’s dry before you put it back in the printer.
- Re-install the cover with it’s screw screws and carefully install the drum unit back in the printer.
- Secure the drum-unit by pressing the blue lever on the right.
- Try some colour prints. If your problem is there, try sanding down further.
Let me know if this sorted your problem, or how you went about solving it. I’ve printed 1000s of sheets since this fix and I have not had the same problem since.
Your Comments and Feedback
Do you also have a Dell 3100CN? How has the printer behaved with you? What do you think? I’d love all your feedback and responses to this project. If you’re from Nelson, Burnley or the surrounding areas, or even if you’re half way across the world, your comments are much appreciated.


We have a streaking problem, but the streaks are white, all in line, and only noticeable when printing in colour. It looks as if something is scratching the colour off during the process. Do you think this is the same cause? I know we had this before, and solved the problem, but I can’t remember how!
Awesome, thanks for this! Much appreciated.
glad it helped you
I got one question, love your article by the way. very helpful, i wanted ask, what if i didn’t want to sand my drum cover. could i just keep it off and let it be. because then it works. thanks
that;s exactly what i did, i sanded it down but after a few weeks the streaks re-appeared. i then just didn’t fit the cover bak in and its been years since i wrote this article but it’s been fine ever since. crap design on Dell’s part 2bh.
What about weak color on the 3100cn?
i just did this to mine and when i put the drum back in to do a test print it was fine so now i just have to get the sanding done.. thanks so much i was going to throw away this printer but now i dont have to thanks so much for posting this..
thats great sherri! i wrote this post nearly 3 years ago and i’m glad it’s still helping people. carry on printing lol!
Tried this but did not find it as a fix to color page streaking.
hi jack, are your toners full? if you’re still getting streaks after trying this and making sure your toners are full, then the problem lies with your drum unit itself
if your toners are full, and this didn’t fix it, then it may be marks or dust on the drum unit itself, i’m afraid – better to replace if this is the case